|
This option allows the user to make hard copies of content within TLOL Suite™ 3.0 should such a need arise. Selected content can also be added to a list and printed together as a bundle using the Printlist feature. Within For Windows™ 7 and Windows™ 8 users only, , except for CLI-TruePage, all other options will contain the following sub-options:
TLOL Suite™ 3.0 will try to preserve the layout of the originally printed pages by following the original line breaks. There will be a one-to-one correspondence of lines between pages printed through TLOL Suite™ 3.0 and the original pages. Any preferences set using “Print Settings” under “Preference and Settings” will be ignored. See Figure 67.
|
This is the default option. Pages will be printed with lines fully justified. Use this option if you do not wish to preserve the original layout and to save paper. Optimum paper size and margins suitable to your needs can be selected everytime by ⇖ clicking on the Page Setup icon on the toolbar on top of the preview window or permanently using “Print Settings” under “Preference and Settings”. See Figure 68
|
.
|
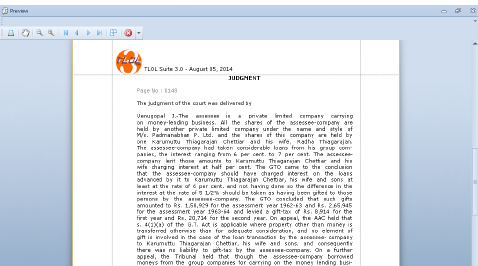
Use this option whenever there is a need to preview the selected document(s) on screen before sending it to the printer.
|
The following are the sub-options available,
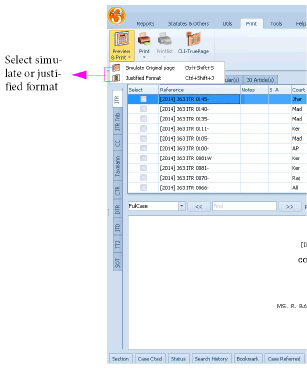
⇖ Click☰ Print → Preview & Print → Simulate Original page.
A window will open showing a preview of the first of the selected pages. Use the right arrow icon to view more pages.
⇖ Click the print icon within the preview window to send pages to printer.
⇖ Click ☰ Print → Preview & Print → Justified Format.
Follow from step 2. under “Simulate Original page”.
|
Use this option to send the selected content directly to printer.
|
|
For options and procedure see those under “Preview & Print”1 ,2. (See Figure 71).
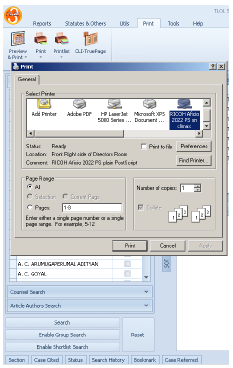
⇖ Click ☰ Print → Print → Simulate Original page.
A print dialogue will appear with the list of available printers.
Select the required printer and ⇖ click Print to send the selected document to that printer.
⇖ Click ☰ Print → Print → Justified Format.
Follow from step 2. under “Simulate Original page”
|
Use this option to add and accumulate selected content to a printlist and print them together as a bundle.
|
The following printing options are available,
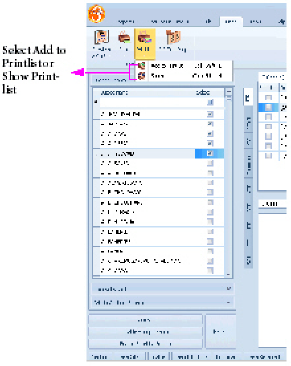
Add to the Printlist – Adds the selected content to the list.
Show – Displays the list of documents currently held in the Printlist and allows sending them to the printer.
|
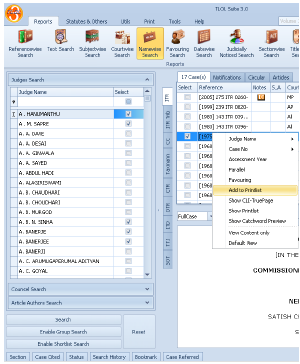
From the Results Panel select any content. Multiple selections can also be made by placing a check mark in the first column titled Select.
You can follow one of the following steps:
or
Right ⇖ click the required caselaw.
A list of options will be displayed.
⇖ Click on the option ☰ Add to Printlist.
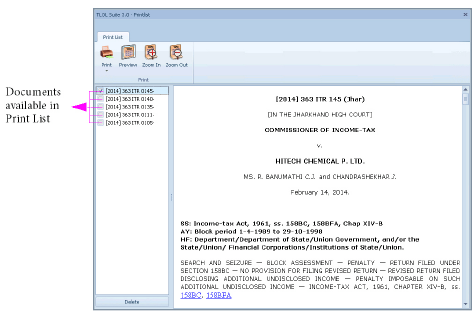
You can follow any one of the following steps mentioned below to view the documents added to the printlist. See Figure 74.
|
⇖ Click ☰ Print → Printlist → Show to view the list of documents held in the Printlist.
or
Right ⇖ click on the selected case and ⇖ click on the option ☰ Show Printlist in the “Results List Window”.
|
CLI-TruePage is a unique feature within TLOL Suite™ 3.0 which allows its users to view and print pages which are exact copies of those from the originally printed volumes. For this reason any preferences set using “Print Settings” under “Preference and Settings” are ignored.
|
TLOL Suite™ 3.0 users no longer have to worry about ruining original volumes from their library when all that is needed are copies of a few pages. TLOL Suite™ 3.0 will access the internet every time this feature is used5.
You can select and view only one page at a time. You can follow any one of the following steps mentioned below.
Select a document in the “Results List Window”.
⇖ Click ☰ Print → CLI-TruePage to open the “TLOL Suite 3.0 – CLI-TruePage” interface.
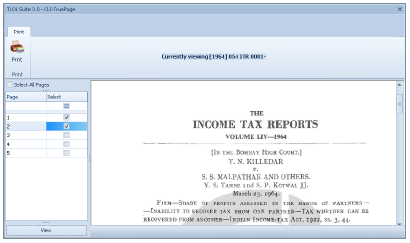
The window shows the list of pages in the left-side panel.
Select the required pages by ⇖ checking the box against the required page.
If you want to select all the pages, ⇖ check the box against Select all pages.
⇖ Click View to preview the content of the selected page(s) in the right panel.
⇖ Click the  icon to send the selected page(s) to the printer
or
Right ⇖ click on the selected document in the “Results List Window”.
⇖ Click on the option ☰ Show CLI-TruePage in the “Results List Window”.
1. T he icon indicates that the document will be printed through the default printer.
2. The icon  indicates the default printer.
3. Separate subscription, activation is required for this module.
4. This feature is available only for content published by the Company Law Institute of India Pvt Ltd group.
5. If TLOL Suite™ 3.0 is unable to establish internet connection, a proxy window may appear (See “Internet Settings”).