|
A comprehensive and easy-to-use workspace awaits the user of TLOL Suite™ 3.0. Emphasis has been placed on helping the user perform all tasks within a single screen. While most features are common across all workspaces, there are a few workspace-specific special optimizations. These are explained under the topics:
The workspaces described above will become available only after encountering The TLOL Suite™ 3.0 Startup Screen, the very first screen that welcomes the user on initiating TLOL Suite™ 3.0.
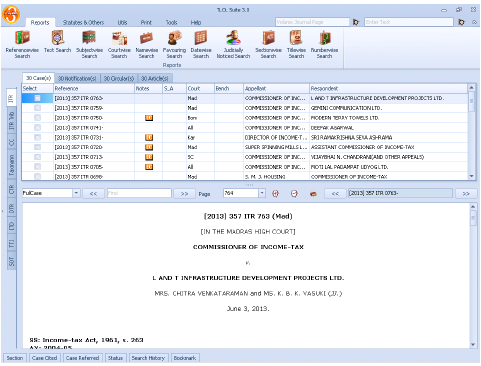
By design, TLOL Suite™ 3.0 opens with a pre-executed search under Reports to find the latest published content (See “About Content”) and displays the last 30 results on screen for a quick perusal (See Figure 2). You may browse through the search result or select any of the search options presented under the ☰ Reports menu to start a new search.
|
This workspace is optimized for content that requires citations for referencing purposes, primarily caselaw.
A typical workspace under the Reports section using Referencewise Search, is explained as an example using a screen-shot. See Figure 3.
|
|
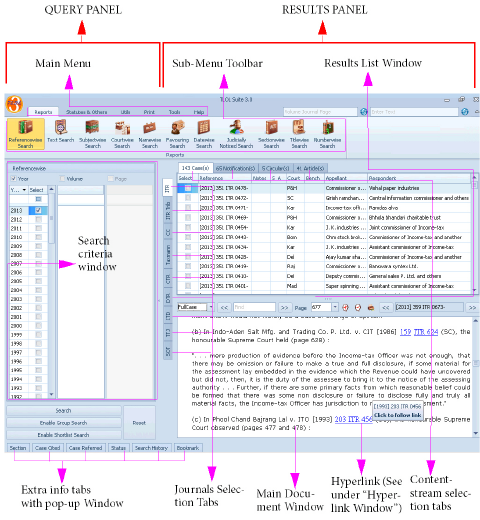
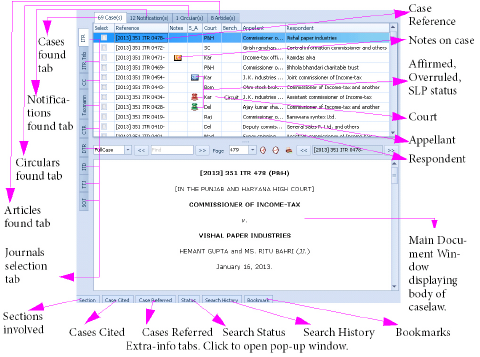
The TLOL Suite™ 3.0 gui1 under Reports has been logically split into 2 vertical portions so that all queries made by the user is accommodated on the left side (“QUERY PANEL” in Figure 3) and the results on the right (“RESULTS PANEL” in Figure 3).
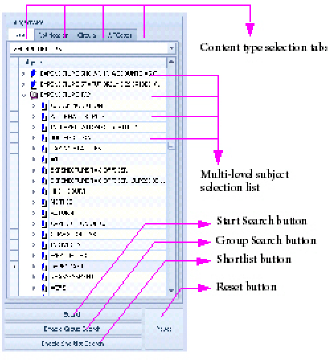
The different search options offered by TLOL Suite™ 3.0 will appear on the left of the TLOL Suite™ 3.0 screen. The “QUERY PANEL” of the Reports section, when using subject-wise search is shown in Figure 4.
|
The results panel is a comprehensive tool in itself and offers a host of information in a single screen apart from having tabs with pop-windows at the bottom to provide extra information whenever needed. The “RESULTS PANEL” is logically split into two vertical portions. The top half contains the result list (“Results List Window” in Figure 3) and the bottom half shows text of the document based on the record you select in the result list (See “Main Document Window” in Figure 3). List of results presented in the “Results List Window” can be sorted and filtered in multiple ways by just clicking on the respective column head. A typical “RESULTS PANEL” under Reports section is shown in Figure 5.
|
Any of the search features within the Reports section
of TLOL Suite™ 3.0 can be
grouped (i.e. combined)
with other search features to produce a more focussed result set. Group
Search works on all the content within Reports section.
For example: You may perform
a Reference-wise search
on a specific volume and then ⇖ click Enable Group Search (See “Group Search
button” in Figure 4), select a judge name under Namewise and then ⇖ click Search (See “Start Search button” in
Figure 4) to find all cases in that volume decided by the
selected judge. By default, unless Group Search is
enabled, TLOL Suite™ 3.0
will automatically disregard any previously selected search function
when a new one is selected. Group
Search can be enabled before or after performing a search. Irrespective
of when it is enabled, Group Search will
always work on the whole data-set within Reports section.
This icon ![]() indicating
that Group Search is active
will be displayed next to the “Sub-Menu Toolbar” (See “A Typical
TLOL Suite™ 3.0 screen”).
indicating
that Group Search is active
will be displayed next to the “Sub-Menu Toolbar” (See “A Typical
TLOL Suite™ 3.0 screen”).
While Group Search works
on the whole data-set available within Reports section
and helps fine-tune your results before you perform any search,Shortlist
Search, as its name implies, allows you to narrow down an
existing result set by searching within that set. For this reason,
the Enable Shortlist Search button (See
“Shortlist button” in Figure 4) will be available only
when there are records available in the result set. Further you can Shortlist Search iteratively any number
of times. This icon ![]() indicating
that Shortlist Search is
active will be displayed next to the “Sub-Menu Toolbar” (See
“A Typical TLOL Suite™ 3.0 screen”).
indicating
that Shortlist Search is
active will be displayed next to the “Sub-Menu Toolbar” (See
“A Typical TLOL Suite™ 3.0 screen”).
Shortlist search option will be disabled when the journal tab is changed.
When viewing results under Reports, for each result displayed in the “Results List Window” additional information such as cases and sections referred, log of your current actions, tools to save your actions etc are available on a click of the respective “Extra-info tabs”.
On a ⇖ click, each of the tabs at the bottom of the Results Panel opens into a larger window showing more information. These pop-windows can also be permanently fixed on screen should you need it to be visible at all times. The following tabs are available:
The case/cases referred to in the highlighted caselaw are listed on the left. ⇖ Click each referred case to view its content on the right panel within the pop-up window.
This window contains two more tabs called Cited and Cited-in. ⇖ Clicking Cited lists cases that have been cited in the highlighted caselaw. While ⇖ Clicking Cited-in lists subsequent cases where the highlighted case has been cited.
The sections of different acts that have been dealt with in the highlighted caselaw are listed.⇖ Clicking each item in the list will display the text of the section on the right.
All actions performed are logged and listed in this window. Users can view the history of actions to check any action or sequence of actions previously performed.
All search actions performed since the beginning of the current TLOL Suite™ 3.0 session are listed here. This list can be used to backtrack a few steps and start searching again or to save a particular search under a specific name. Searches so saved can be re-called at any time without having to remember the exact sequence of events.
Any portion of the result displayed in the “Main Document Window” can be highlighted and bookmarked. Each bookmark can be assigned a unique name with some comments. These bookmarks can be listed and recalled at anytime in the future. Tax professionals can use this to associate their work with the document text.
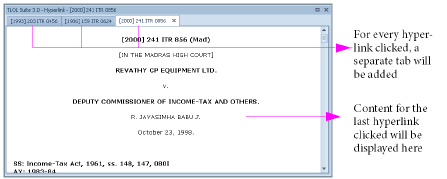
⇖ Click on any link in the “Main Document Window” to open “TLOL Suite™ 3.0- Hyperlink window”, where you can view the content of the selected link (See Figure 6). For every hyperlink clicked a separate tab will be added to the same hyperlink window.
|
This is to avoid cluttering the screen with multiple windows.
TLOL Suite™ 3.0 has vertical and horizontal tabs located above and to the left of the “Results List Window” to help the user access different types of information without leaving the main screen. You may select the journal or the content-stream within that journal before or after performing any search.
Located to the left of the “Results List Window” (See “A Typical TLOL Suite™ 3.0 screen”) these tabs are used for changing the information displayed in the Results Panel to those from the selected journal. All journals available3 within your installation of TLOL Suite™ 3.0 are listed here. Journal Selection Tabs can be changed either before or after completing your search to bring focus to the results falling under the selected journal.
Located on top of the “Results List Window” (See “A Typical TLOL Suite™ 3.0 screen”) these tabs are used for changing the information displayed in the Results Panel to the content-stream4 of the selected journal9. Content-stream Selection Tabs can be changed either before or after completing your search to bring focus to the results of the selected content-stream for the selected journal.
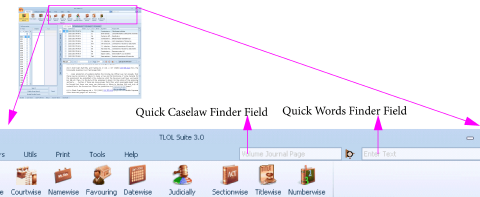
For quickly viewing the caselaw of a citation known to you, enter the citation, in the sequence mentioned in greyed text, in the “Quick Caselaw Finder Field” above the main menu. This will immediately display the citation in the “Results List Window” and the text of the case in the “Main Document Window” (See Figure 7)
|
. You may also enter just the volume number and the journal short-form (as indicated) to view all cases in that volume.
For quickly searching text, enter the required words in the “Quick Words Finder Field” above the main menu. This will perform a search for these words on all content in the Reports section (See “About Content”). The results, based on the journal and content-stream you select, will be displayed in the “Results List Window” and the text of the first result (automatically selected) will appear in the “Main Document Window” (See Figure 7). Please note that this quick finder only searches for phrases or all the words appearing in the find field in the same order and expects words to be at least three characters long.
This workspace is optimized for content that do not need a citation for referencing purposes, primarily Acts, Rules, Bills etc. Unlike the Reports section which predominantly goes by citation, Text Search is the only search facility that is available here.
A typical workspace under the Statutes and Others section using Acts as an example is explained using a screen-shot in Figure 8
|
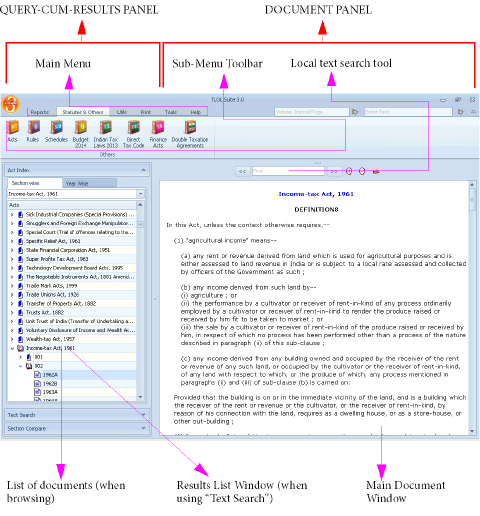
The TLOL Suite™ 3.0 gui7 under Statutes and Others has been logically split into 2 vertical portions so that all queries made by the user and their results are accommodated on the left side (See “QUERY-CUM-RESULTS PANEL” in Figure 8) and the resultant document on the right (See “DOCUMENT PANEL” in Figure 8).
The “QUERY-CUM-RESULTS PANEL” in this section, by default also allows for browsing all available content. When the Text Search feature is invoked, the same panel doubles as a “Results List Window”.
The “DOCUMENT PANEL” in this section is quite simple and serves to display the contents of the item selected in the “QUERY-CUM-RESULTS PANEL”, hence it contains only one large “Main Document Window”. As the content displayed in this window are usually long, users will find a Local text search tool5 in the toolbar above the Main Document Window to quickly find information (See Figure 8).
Features common to all functions within TLOL Suite™ 3.0:
To start TLOL Suite™ 3.0, ⇖ click ![]() on the Windows™ taskbar and then select
☰ TLOL Suite™ 3.0 → TLOL Suite™ 3.0
on the Windows™ taskbar and then select
☰ TLOL Suite™ 3.0 → TLOL Suite™ 3.0
To exit, within TLOL Suite™ 3.0, ⇖ click ![]() → Exit
→ Exit
Toolbar handling in TLOL Suite™ 3.0 is consistent with Microsoft™ Office style toolbars. When you move the mouse over any tool button a tool-tip message is displayed below the mouse-pointer briefly describing the function of the tool.
The “Main Menu” and “Sub-Menu Toolbar” as shown in Figure 3 cover all the features offered by TLOL Suite™ 3.0. ⇖ Click on the Main Menu and then on any button in the sub-menu toolbar to invoke that option.
Menu selection in TLOL Suite™ 3.0 is consistent with normal Windows™ menu selection procedures.
You may select a menu in any of the following ways:
Use the mouse to ⇖ click on the menu name you want, to open it or its sub-menu.
Press ⌨ Alt or ⌨ F10 followed by letter/letters automatically underlined in the toolbars to open a menu (for example, ⌨ Alt + R to open the Reports menu).
Press ⌨ Alt or ⌨ F10, use the left-right arrow keys to highlight the main-menu item you want, then press up-down arrow keys to highlight the sub-menu item and then press ⌨ enter or ⌨ space to open it.
When you hover over some commands with a mouse the tooltip that appears will list a key-sequence (for example the tooltip for Court-wise Search shows “Ctrl+O”). You may press this key combination without opening the menu to directly execute the command. See also “Keyboard shortcuts”.
This option allows you to select the journal on which any search will run first. Select the journal priority by ⇖ clicking the radio button ⌼ against its name and ⇖ click OK. See Figure 9.
|
Please ⇖ check the box against the option Show Catchword Preview to preview the catchwords of any case6. As you scroll the mouse over the results in the “Results List Window”, a popup window displaying the catchwords of the case below mouse cursor will appear. The same option can be selected using the Mouse Right-click options in “Results List Window”.
This option allows you to prioritise search to look-up only Cases or Notifications or Circulars or Articles first. Select the required stream by ⇖ clicking the radio button ⌼ against its name and ⇖ click OK. This selection only affects the primary search operation, you may switch from one content stream to another within TLOL Suite™ 3.0 by ⇖ clicking the relevant content stream tab. Only the selected content stream will be updated. By default, Cases tab will be selected. If you require all the content streams to be updated simultaneously, please ⇖ click on the radio button ⌼ against the option All. Selecting All will slow down the search feature.
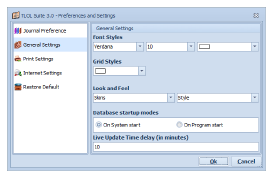
See Figure 10. This option allows to set the following.
|
You may change the font style, font size and font colour that appear on screen by selecting the required style from the list of available choices. Select the required style and ⇖ click OK.
This option helps you to select the colour of the grid that appears on the screen. Select the required grid style and ⇖ click OK.
This option is used to select different themes for the general screen appearence. Select the required skin and ⇖ click OK.
On System start:
On selecting this startup mode, TLOL Suite™ 3.0 database service will start automatically in the background when the system starts. ⇖ Click on the ⌼ radio button against the option and ⇖ click OK. This mode is recommended for better performance.
On Program start:
On selecting this startup mode, TLOL Suite™ 3.0 database service will be started when the program starts and shut down when the program exits. ⇖ Click on the ⌼ radio button against the option and ⇖ click OK.
You may use this option to set the time interval (in minutes) for the live update to start after the program is started. Enter the time limit (e.g. 5) in the field displayed and ⇖ click OK. Live update will periodically check for updates based on the interval you set.
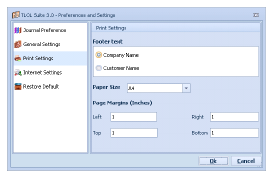
These options allow limited control over the layout of the printed page and the information that is presented therein.
Select either “Company Name” or “Customer Name” to be included at the bottom of every page printed from within TLOL Suite™ 3.0. You can choose the required option by ⇖ clicking the radio button ⌼ against the respective choices and ⇖ clicking OK. By default, Company Name will be selected. See Figure 11
|
Select the optimum size suitable for your printer from the list of sizes available here. The selection here determines the default paper size for all printing within TLOL Suite™ 3.0 when using the “Justified Format” option under “Print” or “Printlist”. ⇖ Click OK when done with the selection.
Exceptions:“CLI-TruePage,” “Simulate Original page” use pre-set values that cannot be changed. Quick print buttons use the Windows™ system default print settings.
Allows you the set the left, right, top and bottom margins for all print output generated from within TLOL Suite™ 3.0. ⇖ Click OK when done with entering the values.
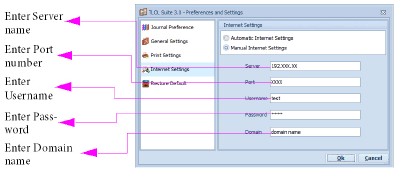
If your internet connection is proxy enabled, TLOL Suite™ 3.0 will, by default,
use your internet explorer setting. If TLOL Suite™ 3.0 is
unable to connect, you may provide proxy settings by ⇖ clicking on ![]() -> Preference
& settings. In the window that appears, ⇖ click on Internet
settings on the left panel. ⇖ Click on
the ⌼ radio button against Manual Internet setting on the right
panel. Fill the details and ⇖ click OK. See Figure 12
-> Preference
& settings. In the window that appears, ⇖ click on Internet
settings on the left panel. ⇖ Click on
the ⌼ radio button against Manual Internet setting on the right
panel. Fill the details and ⇖ click OK. See Figure 12
|
If TLOL Suite™ 3.0 is still unable to establish an internet connection, it may automatically ask you for proxy settings by displaying the auto window for internet settings. See Figure 13
|
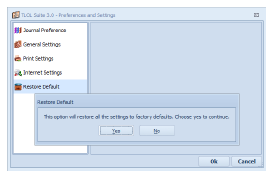
This option allows you to restore all the current settings to factory default. ⇖ Click Yes to restore settings. See Figure 14
|
Throughout TLOL Suite™ 3.0, in all areas where individual items have to be picked/selected from long lists, you will find one or both of the following features:
Quick and easy selection of items by automatically shortening or scrolling through long lists.
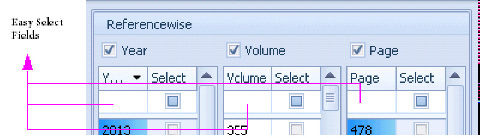
Empty fields are provided, generally below respective column labels, where you can place the cursor and type in characters. On typing the first few characters within this field, the list below will automatically shorten to show only the items containing the characters typed or the selection bar will move to the first item starting with the characters typed. See Figure 15 for an example of the “Easy Select Fields” under Reference-wise search.
|
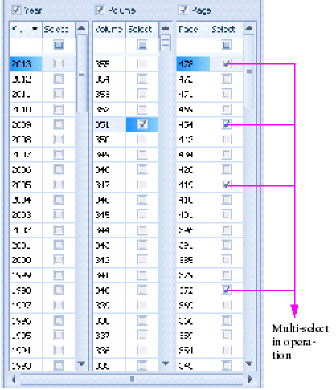
Non-contiguous selection of multiple items from lists
Wherever you find check boxes provided next to long lists of selectable items, TLOL Suite™ 3.0, depending on the context7 may allow multiple selection. For example, under Reference-wise search, the pages for the selected volumes may be ⇖ checked without regard to the order in which they are presented so that only the ⇖ checked items are displayed in the “Results List Window”. Further, Multi-select can be used in combination with Easy-select, where both are available. See Figure 16
|
for an example of a list that allows Multi-select using Reference-wise search as an example.
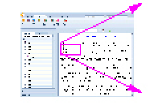
Anywhere in the “Results List Window” or “Main Document Window” (See Figure 3), ⇖ right-click of the mouse will bring up a small menu to create bookmarks, control font type, size or colour, enable or disable certain features, zoom in or out, maximise current window etc. This is to make reading or identifying information easier.
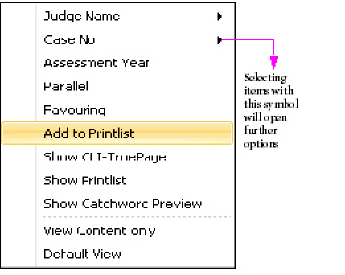
Right-click options in the “Results List Window” under Reports will help you to
|
view the judge name, assessment year, add the selected case to the printlist, see catchword preview etc.
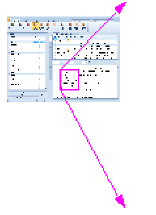
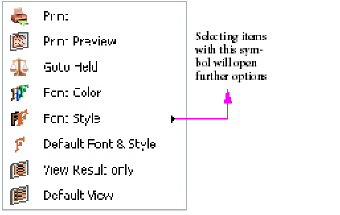
Right-click options in the “Main Document Window” under Reports and Statutes and Others will help to print the document, show the preview of the document to be printed, change the display font style, colour etc. (See Figure 18).
|
|
Within TLOL Suite™ 3.0 pressing the ⌨ Alt at any time will display the keyboard shortcuts to access the items within the “Main Menu” panel. Depressing the desired keyboard shortcut will display the next level of keyboard shortcuts. For example, pressing⌨ Alt will display the following
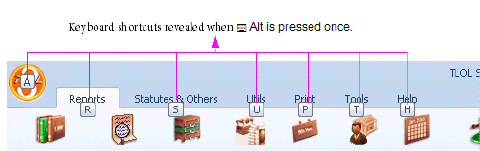
over the “Main Menu”. Next, pressing⌨ R will select ☰ Reports and display the following
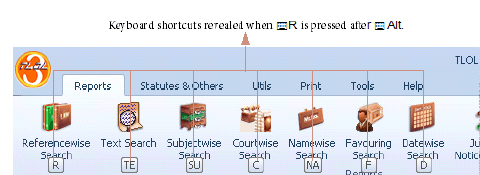
over the “Sub-Menu Toolbar”. Pressing ⌨ S + U will bring up ☰ Subjectwise search window.
For certain important or frequently used search functions TLOL Suite™ 3.0 also provides a secondary set of shorter keyboard shortcuts for easier access using a ⌨ Ctrl + <key> sequence. For example pressing ⌨ Ctrl + R will activate Referencewise search.
The secondary keyboard shortcut is displayed within a tooltip window when hovering the mouse over any search menu within TLOL Suite™ 3.0.
In this “Users Guide”, both the primary and secondary keyboards (if provided) appear immediately after the title explaining the respective search feature.
1. Graphical User Interface
2. Available only for caselaw results.
3. Available journals will depend on the TLOL Suite™ 3.0 modules opted for and subscribed to by the user.
4. Not all streams are available for all journals.
5. This is different from the Text search feature found in query panels.
6. Catchword preview is functional only on journals published by Company Law Institute of India Pvt Ltd group.
7. To determine whether Multi-select is allowed in a particular area, simply try ⇖ checking more than one item from the list. If ⇖ checking the second item removes the first selection, then Multi-select is not allowed.